Spotify Analysis

Source
Youtube Link:
.svg_16893588212685776551.png)
Spotify Analysis with PySpark
Hello! Hello! It’s OG again. This time we’ll be building an End-to-End ELT data pipeline and a Recommender System based on analytics from the Spotify API. Without further ado, let’s get started.
Introduction
This project involves building a music analytics system from Spotify, as shown in the diagram below:
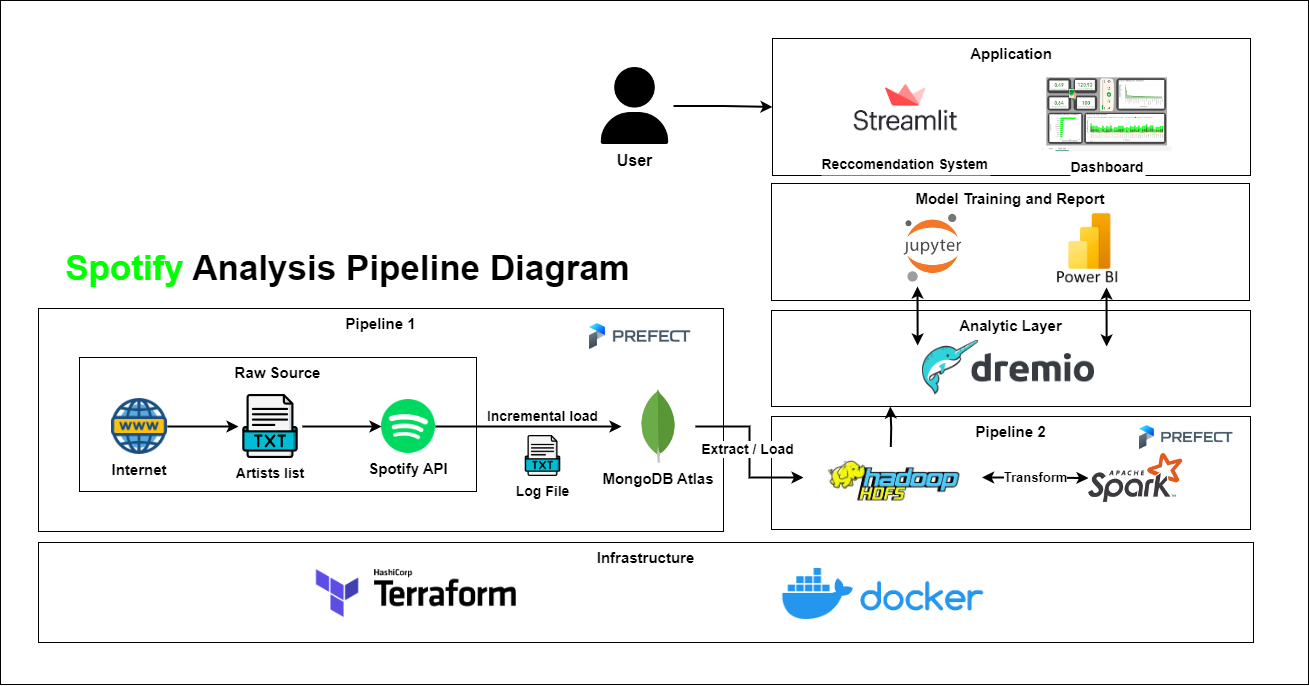
The diagram includes the following components:
- Infrastructure: We will use Docker to set up most of the frameworks used in the system and optionally use Terraform to set up MongoDB.
- Pipeline 1: This pipeline performs incremental loading into MongoDB each time data is pulled from the Spotify API.
- Pipeline 2: This data pipeline performs ELT (Extract, Load, Transform) to process and normalize JSON data from MongoDB. Most of the work dealing with the complex, nested JSON structure will be handled by PySpark (Python API for Apache Spark) on HDFS (Hadoop Distributed File System).
- Analytic Layer: To analyze the data, we will apply an analytics layer on top of Hadoop. In this project, we will use Dremio for that.
- Machine learning and Dashboard: This part involves training a machine learning model for the Spotify music recommendation system. Additionally, we can use PowerBI to create dashboards to analyze data from Dremio.
- Application: Finally, we will use Streamlit to build a simple web application for the music recommendation and search system. Users can also interact with the BI Dashboard at this layer.
Data Schema
Our data source comes from the Spotify API. We will also scrape a list of Spotify artists from Sportify Artists. The final processed data will have the following schema:

Infrastructure
We will primarily use Docker to configure most of the frameworks in the system via a docker-compose.yml file. MongoDB Atlas, however, can be set up in multiple ways.
Apache Hadoop
First, we will set up Apache Hadoop using Docker Compose. As we know, Hadoop is a Java-based framework introduced by Google in 2006 that leverages distributed system technology to store and process Big Data. Hadoop is built on three main components:
- HDFS (Hadoop Distributed File System): A distributed file system used for data storage.
- YARN (Yet Another Resource Negotiator): A resource management framework for running applications on Hadoop.
- MapReduce: A parallel data processing framework in a distributed system environment.

HDFS and YARN in Hadoop
In this project, we will simplify the setup by omitting the MapReduce component in the Hadoop Cluster and only using HDFS and YARN (since we will use Apache Spark for processing). Additionally, as this is a PoC (Proof of Concept) project, we will simplify the Hadoop cluster to just one Master Node and one Worker Node.
volumes:
  hadoop_datanode:
  hadoop_namenode:

services:
  namenode:
    container_name: namenode
    image: apache/hadoop:3
    hostname: namenode
    command: bash -c "if [ ! -f /tmp/hadoop-root/dfs/name/.formatted ]; then hdfs namenode -format && touch /tmp/hadoop-root/dfs/name/.formatted; fi && hdfs namenode"
    ports:
      - 9870:9870
      - 8020:8020
      - 9000:9000
    user: root
    env_file:
      - .env
    volumes:
      - hadoop_namenode:/tmp/hadoop-root/dfs/name
    networks:
      - docker-net

  datanode:
    image: apache/hadoop:3
    container_name: datanode
    hostname: datanode
    command: ["hdfs", "datanode"]
    ports:
      - 9864:9864
      - 9866:9866
    expose:
      - 50010
    env_file:
      - .env
    user: root
    volumes:
      - hadoop_datanode:/tmp/hadoop-root/dfs/data
    networks:
      - docker-net

  resourcemanager:
    image: apache/hadoop:3
    hostname: resourcemanager
    command: ["yarn", "resourcemanager"]
    ports:
       - 8088:8088
    env_file:
      - .env
    volumes:
      - ./test.sh:/opt/test.sh
    networks:
      - docker-net

  nodemanager:
    image: apache/hadoop:3
    command: ["yarn", "nodemanager"]
    env_file:
      - .env
    ports:
      - 8188:8188
    networks:
      - docker-net
We will primarily use HDFS as the Data Lake for this project. Additionally, you can access Hadoop services through:
- Namenode:
localhost:9870 - Datanode:
localhost:9864 - Resource Manager (YARN):
localhost:8088
Prefect
Prefect is an easy-to-use orchestration tool with an attractive interface that simplifies task scheduling, organization, and parallel (concurrent) task execution. We will set up a Prefect server and API using Docker:
  prefect-server:
    build:
      context: ./prefect
    image: prefect
    hostname: prefect-server
    container_name: prefect-server
    volumes:
      - prefect:/root/.prefect
    command: prefect server start
    environment:
      - PREFECT_UI_URL=http://127.0.0.1:4200/api
      - PREFECT_API_URL=http://127.0.0.1:4200/api
      - PREFECT_SERVER_API_HOST=0.0.0.0
    ports:
      - 4200:4200
    networks:
      - docker-net

  prefect:
    image: prefect:latest
    container_name: prefect
    restart: always
    volumes:
      - "./prefect/flows:/opt/prefect/flows"
      - "/etc/timezone:/etc/timezone:ro"
      - "/etc/localtime:/etc/localtime:ro"
    env_file:
      - .env
    networks:
      - docker-net
    depends_on:
      - prefect-server
Instead of using the built-in image from PrefectHQ, we will build a custom image to allow easier customization. In addition to the Python modules in requirements.txt, we will configure Java 11 for PySpark compatibility:
ARG IMAGE_VARIANT=slim-buster
ARG OPENJDK_VERSION=11
ARG PYTHON_VERSION=3.11.0

FROM python:${PYTHON_VERSION}-${IMAGE_VARIANT} AS py3
FROM openjdk:${OPENJDK_VERSION}-${IMAGE_VARIANT}

COPY --from=py3 / /

WORKDIR /opt/prefect
COPY requirements.txt .
RUN pip install -r requirements.txt --trusted-host pypi.python.org --no-cache-dir

COPY flows /opt/prefect/flows

# Run our flow script when the container starts
CMD ["python", "flows/main_flow.py"]
We can access the Prefect UI at
localhost:4042to trigger the pipeline.
Dremio
Now that we have a data lake in Hadoop HDFS, we need an Analytic Layer to analyze or query the data, as HDFS does not provide these capabilities. We have various options such as Trino or Hive, but in this project, we will use Dremio, a Lakehouse platform.
Dremio is an open-source data-as-a-service platform that supports analytics and can easily connect with various data sources, including Hadoop. Dremio provides powerful query capabilities with its SQL engine and a user-friendly interface:
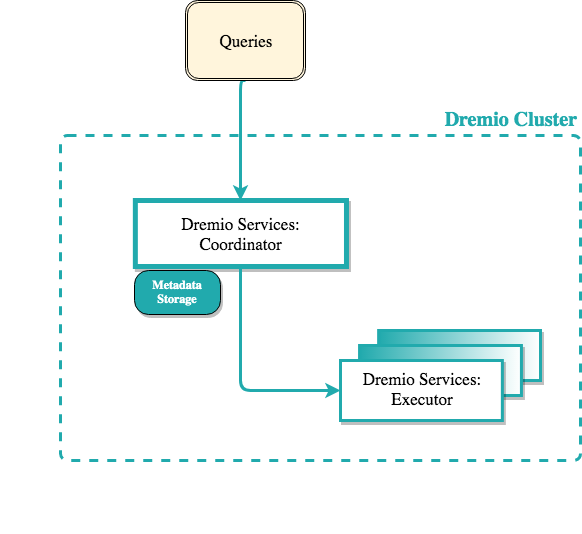
Dremio Cluster
We will configure a Dremio cluster using the dremio-oss image, which includes:
- Embedded Zookeeper
- Master Coordinator
- Executor
dremio:
  image: dremio/dremio-oss
  hostname: dremio
  container_name: dremio
  restart: always
  user: root
  volumes:
    - dremio_data:/var/lib/dremio
    - dremio_data:/localFiles
    - dremio_data:/opt/dremio
  ports:
    - "9047:9047"   # Web UI (HTTP)
    - "31010:31010" # ODBC/JDBC client
    - "32010:32010" # Apache Arrow Flight clients
  networks:
    - docker-net
After successfully deployed, we can access Dremio UI at
localhost:9047with username=dremio and password=dremio123
MongoDB with Terraform
About Terraform: HashiCorp Terraform is an “infrastructure as code” tool that allows us to set up and configure resources, whether on-prem or in the cloud, simply by writing configuration files.
MongoDB Atlas: You can manually configure MongoDB without Docker Compose via this link. However, in this section, we will automate the setup using Terraform.
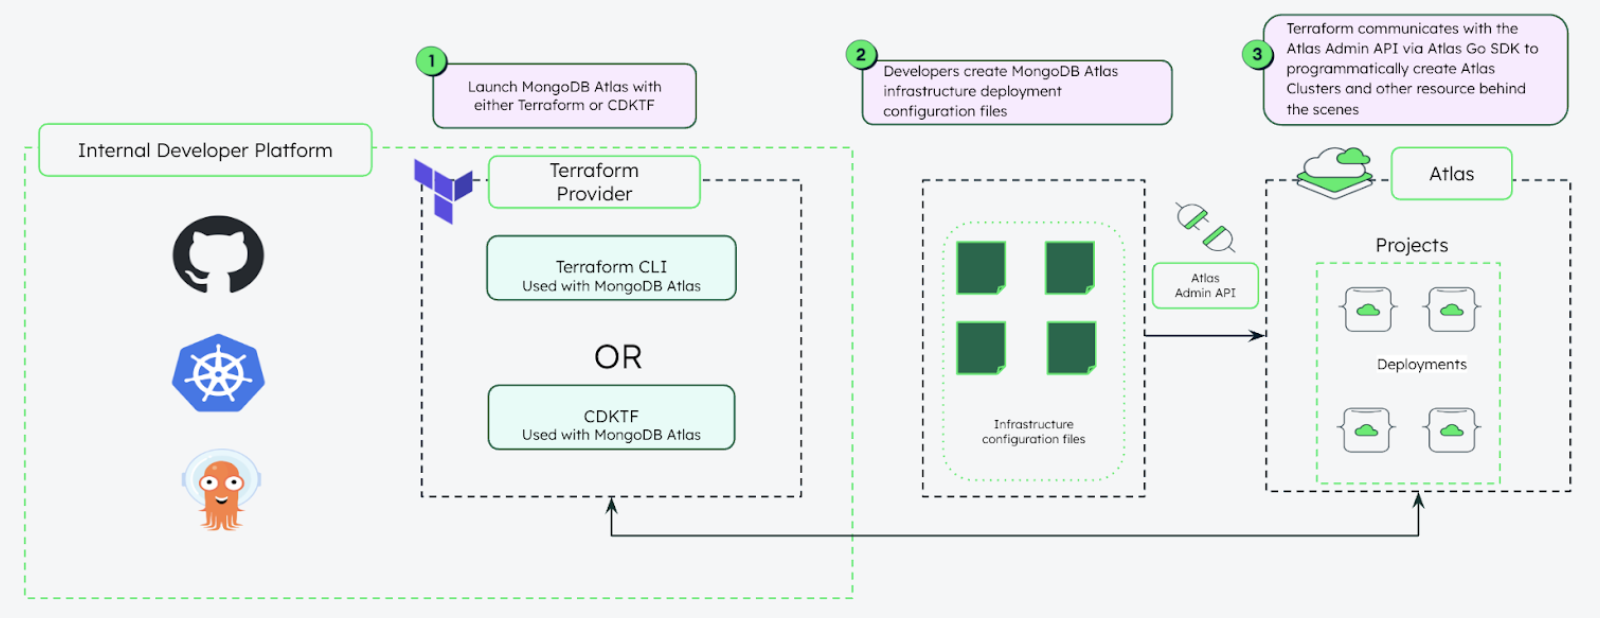
First, you need a MongoDB Atlas account. The next step is to set up some variables in the variable.tf file. This file will store most of the environment variables, API keys, tokens, etc.
variable.tf file hereWith Terraform, we’ll primarily run the main.tf file because it contains all the configuration to deploy the cluster.
We’ll use the MongoDB Atlas Provider and refer to the variables defined in variable.tf as follows:
terraform {
  required_providers {
    mongodbatlas = {
      source = "mongodb/mongodbatlas",
      version = "1.8.0"
    }
  }
}

provider "mongodbatlas" {
  public_key = var.public_key
  private_key = var.private_ke
}Next, we’ll create a few resources to complete the setup:
mongodbatlas_project: This resource sets up the project.
resource "mongodbatlas_project" "spotify_project" {
  name = "spotify_project"
  org_id = var.org_id
  is_collect_database_specifics_statistics_enabled = true
  is_data_explorer_enabled = true
  is_performance_advisor_enabled = true
  is_realtime_performance_panel_enabled = true
  is_schema_advisor_enabled = true
}mongodbatlas_cluster: This resource sets up the MongoDB Atlas cluster. We will host it on GCP, but you can also choose Azure or AWS.
resource "mongodbatlas_cluster" "spotify" {
  name = var.cluster_name
  project_id = mongodbatlas_project.spotify_project.id
  backing_provider_name = "GCP"
  provider_name = "TENANT"
  provider_instance_size_name = var.cluster_size
  provider_region_name = var.region
}
Deploy the Cluster Once the configuration is ready, you can run Terraform CLI commands to set up the plan:
terraform init  # set up provider for atlas
terraform plan
Then, type yes to proceed with the setup. To deploy the cluster, just enter terraform apply. The result will look like this:
Apply complete! Resources: 4 added, 0 changed, 0 destroyed.

Outputs:

password = "123"
srv_address = "mongodb+srv://spotify-cluster.kdglyul.mongodb.net"
user = "root"
Pay attention to the information in the last three lines: password, srv_address, and user. These details will be needed for the .env file to set up the connection with MongoDB Atlas later. These will be the MONGODB_PASS, MONGODB_SRV and MONGODB_USER.
terraform destroy. Be cautious, as this command will remove the entire cluster and all data.Pipeline 1
This data pipeline performs API pooling to crawl data from the Spotify API and incrementally loads it into MongoDB Atlas. To handle the rate limit issue, we configure this flow to automatically trigger every 2 minutes and 5 seconds, crawling a batch of information for 5 artists from the artists.txt file.
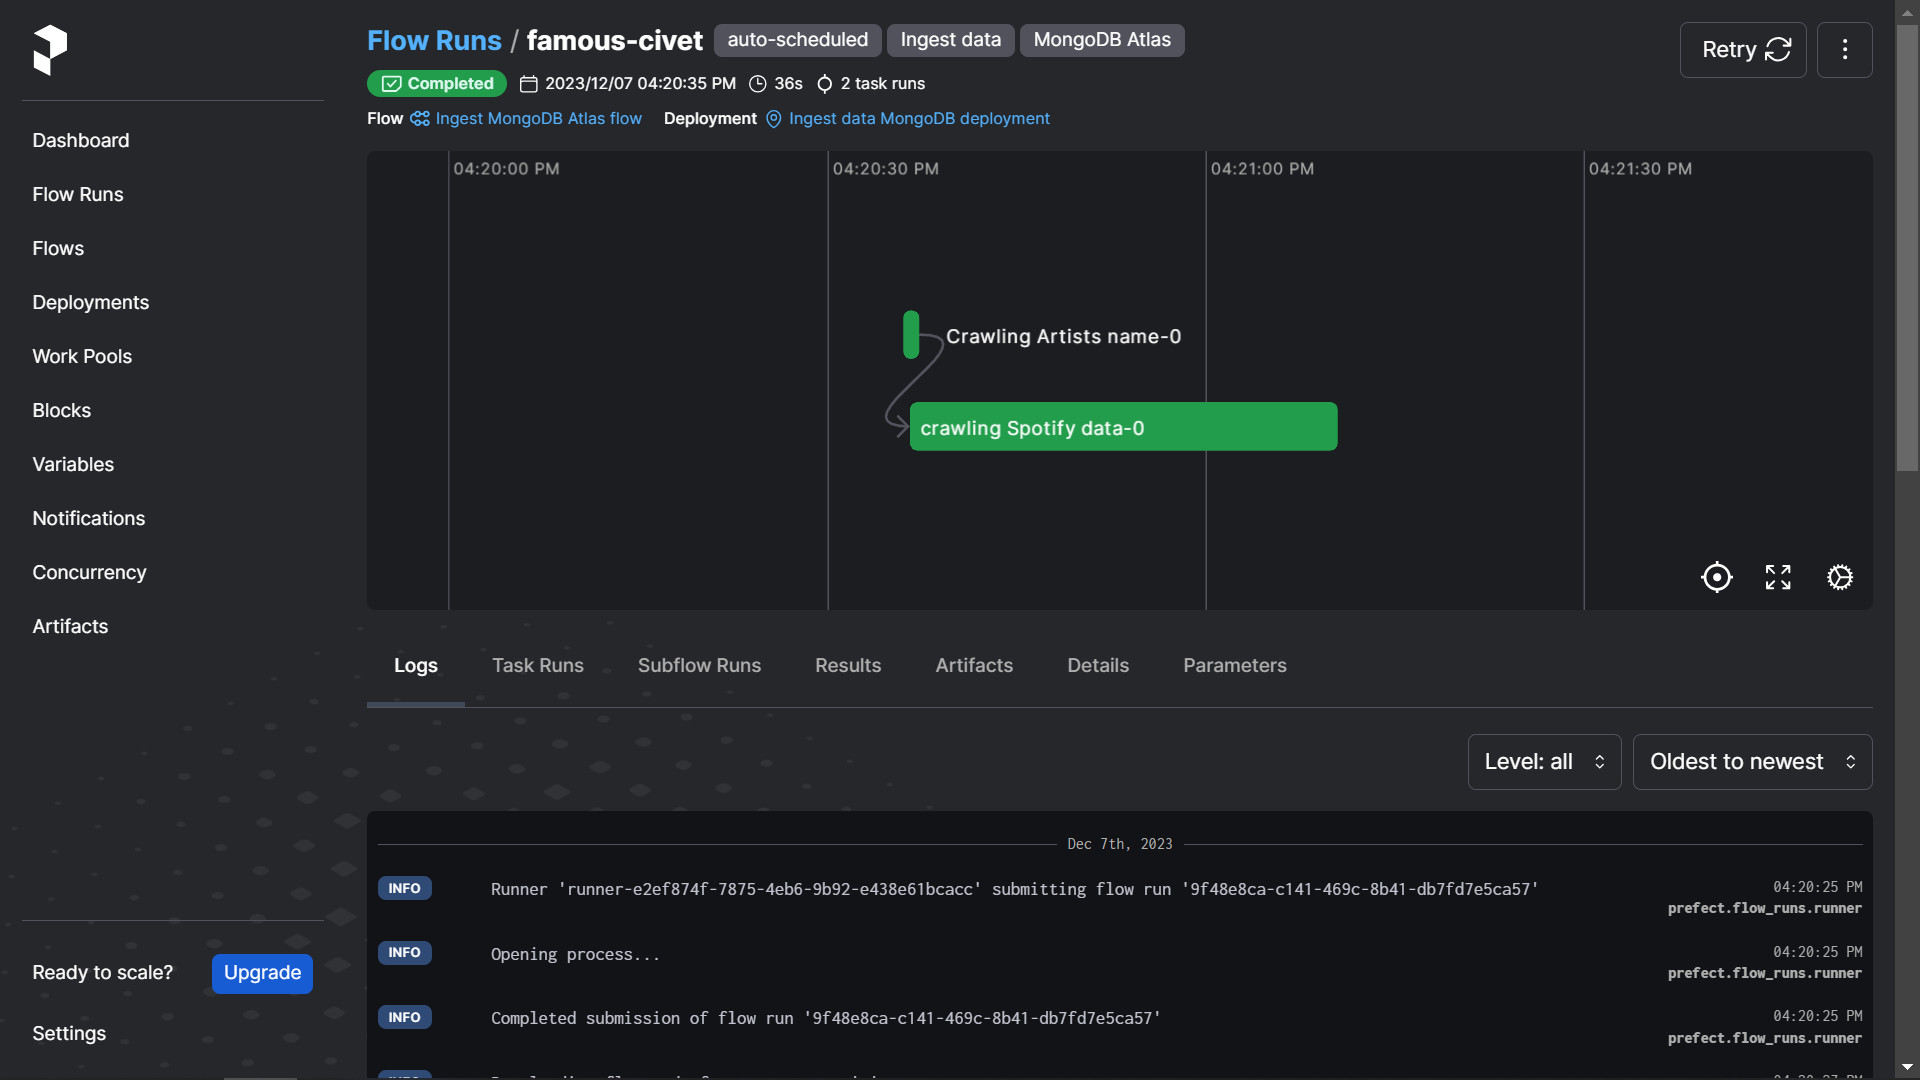
artists.txt file by calling the Spotify API in batches and using a log.txt file to track the index and number of artists successfully crawled.Pipeline 2
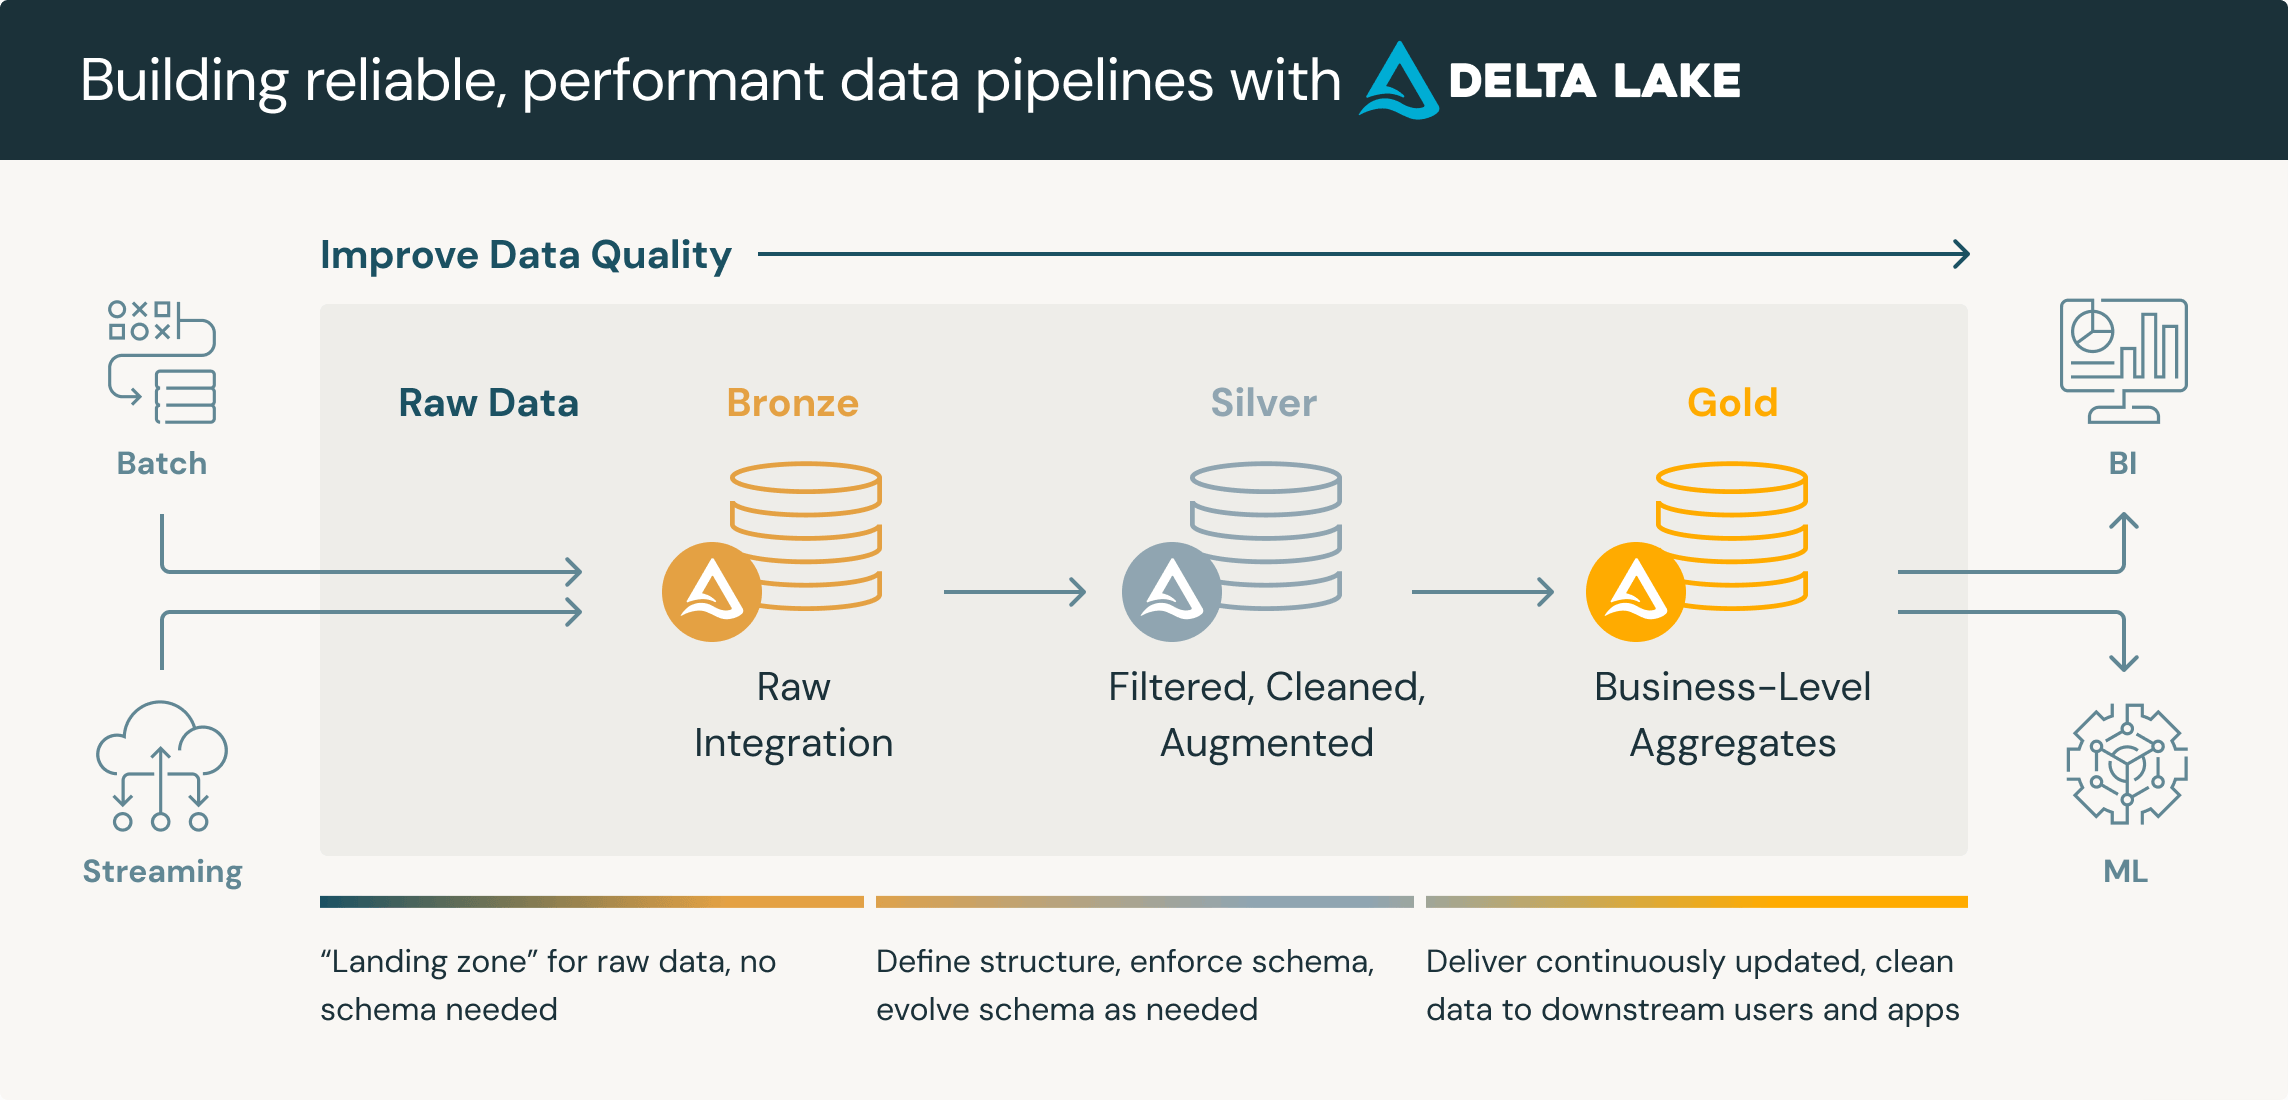
This is the main part of the project where most of the processing takes place. It follows an ELT (Extract - Load - Transform) pipeline model with raw data from MongoDB collections, which is then processed with Spark and stored in HDFS. We will also build a Medallion Architecture within HDFS to partition the data.
This architecture, introduced by Databricks, is a “data design pattern” used to organize data in a Lakehouse to improve data quality through its layers (Bronze -> Silver -> Gold).
PySpark
You might wonder why Apache Spark is not set up. There are two reasons:
- Limited resources: With many services running simultaneously via Docker containers, setting up an additional Spark Cluster might exceed resource limits.
- Small dataset: The dataset size is relatively small (around 200K observations), so using Spark could be overkill. However, for learning purposes, we will use Spark in local mode rather than setting up a standalone cluster.
Apache Spark offers several running modes depending on project scale:
local[*]: Local mode, no need for a Spark Cluster setup.spark://{master-node-name}:7077: Standalone mode, connecting to a Spark Clusteryarn-client: Yarn-client modeyarn-cluster: Yarn-cluster modemesos://host:5050: Mesos cluster
For this project, we will use local mode to optimize resources. To simplify creating and stopping SparkSessions, we write a SparkIO using contextlib
from pyspark.sql import SparkSession
from pyspark import SparkConf
from contextlib import contextmanager

@contextmanager
def SparkIO(conf: SparkConf = SparkConf()):
    app_name = conf.get("spark.app.name")
    master = conf.get("spark.master")
    print(f'Create SparkSession app {app_name} with {master} mode')
    spark = SparkSession.builder.config(conf=conf).getOrCreate()
    try:
        yield spark
    except Exception:
        raise Exception
    finally:
        print(f'Stop SparkSession app {app_name}')
        spark.stop()
This approach simplifies the creation and termination of SparkSessions, ensuring we don’t miss any steps.
We can do something similar for MongoDB connections by writing a MongoDB_io
from pymongo import MongoClient
from pymongo.errors import ConnectionFailure
from contextlib import contextmanager
import os

@contextmanager
def MongodbIO():
    user = os.getenv("MONGODB_USER")
    password = os.getenv("MONGODB_PASSWORD")
    cluster = os.getenv("MONGODB_SRV")
    cluster = cluster.split("//")[-1]
    uri = f"mongodb+srv://{user}:{password}@{cluster}/?retryWrites=true&w=majority"
    try:
        client = MongoClient(uri)
        print(f"MongoDB Connected")
        yield client
    except ConnectionFailure:
        print(f"Failed to connect with MongoDB")
        raise ConnectionFailure
    finally:
        print("Close connection to MongoDB")
        client.close()
Data Processing
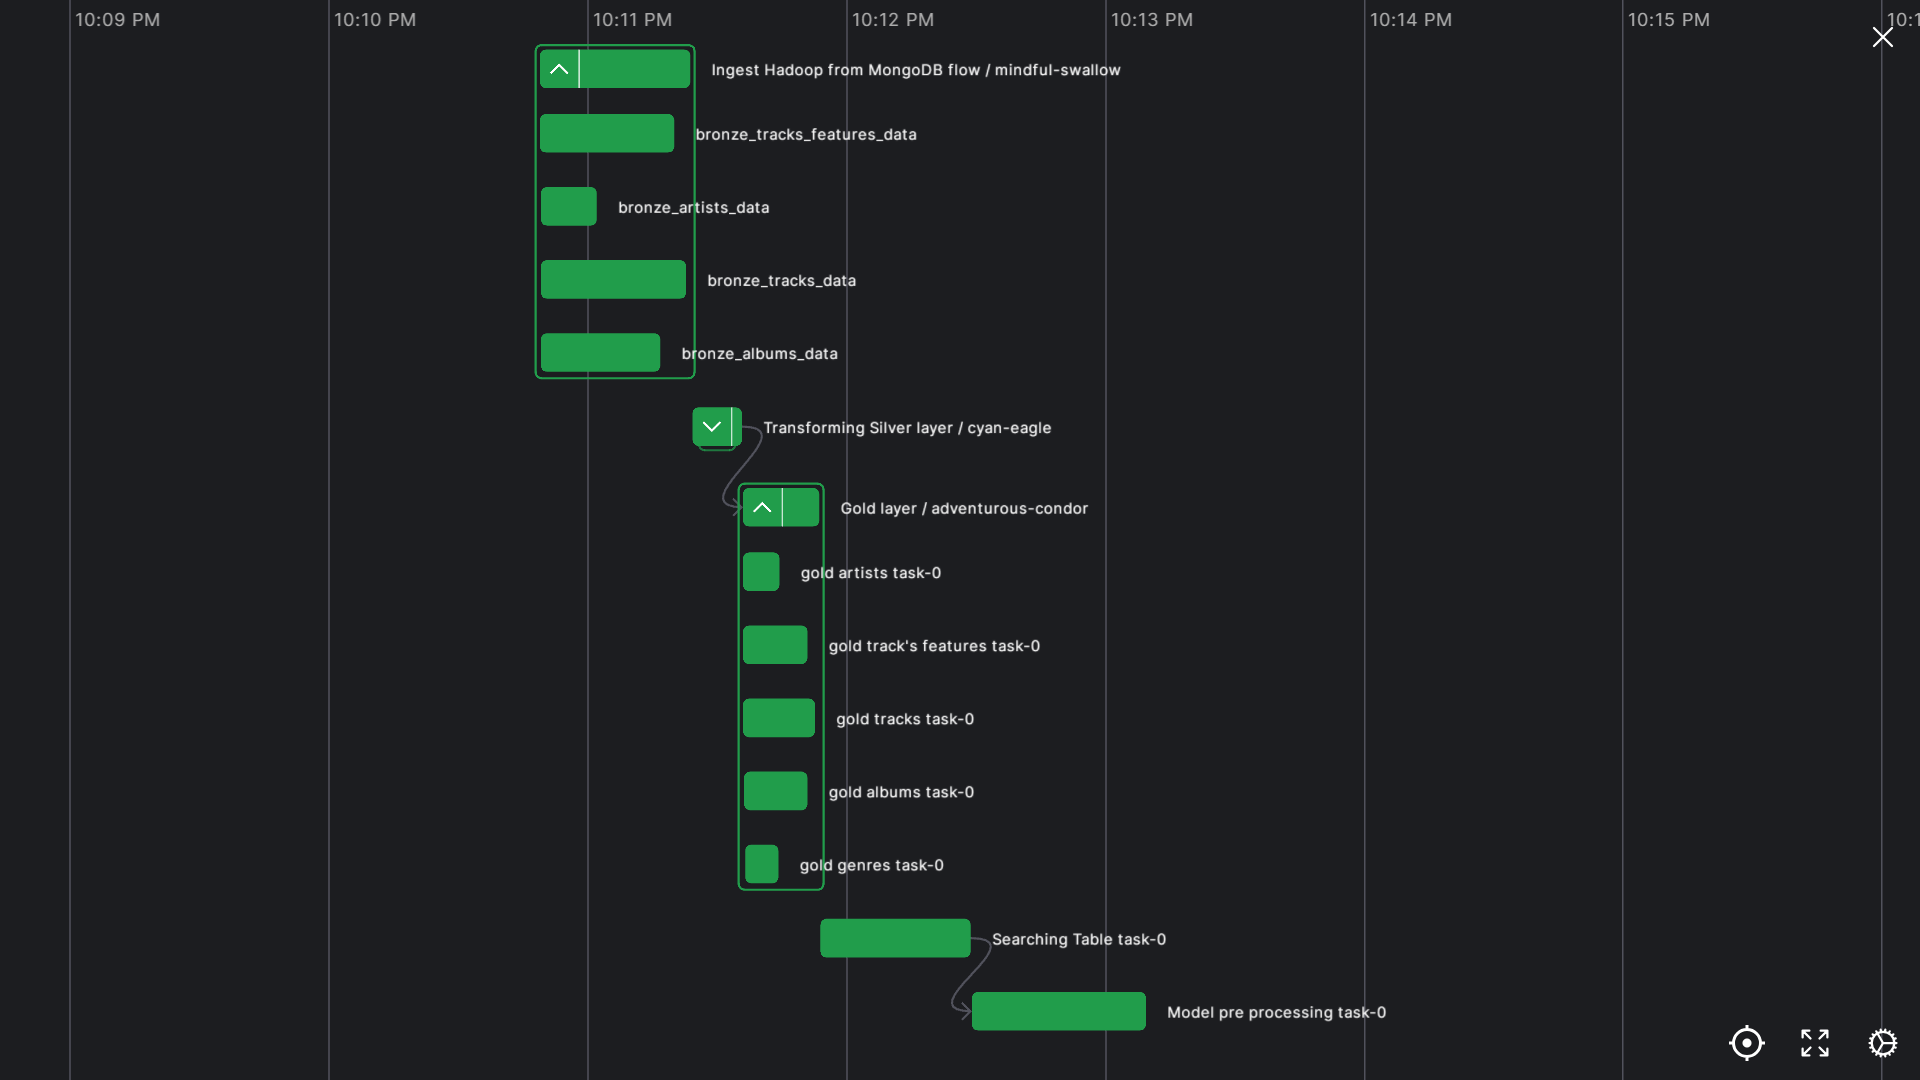
We will organize HDFS using the Medallion architecture, dividing data quality into different zones (or directories):
- Bronze Layer: Stores raw data.
- Silver Layer: Stores partially processed data (handling data types, arrays, and complex nested structures) from the Bronze Layer.
- Gold Layer: Stores cleaned data after standardizing and cleaning the tables from the Silver Layer.
Analytic Layer
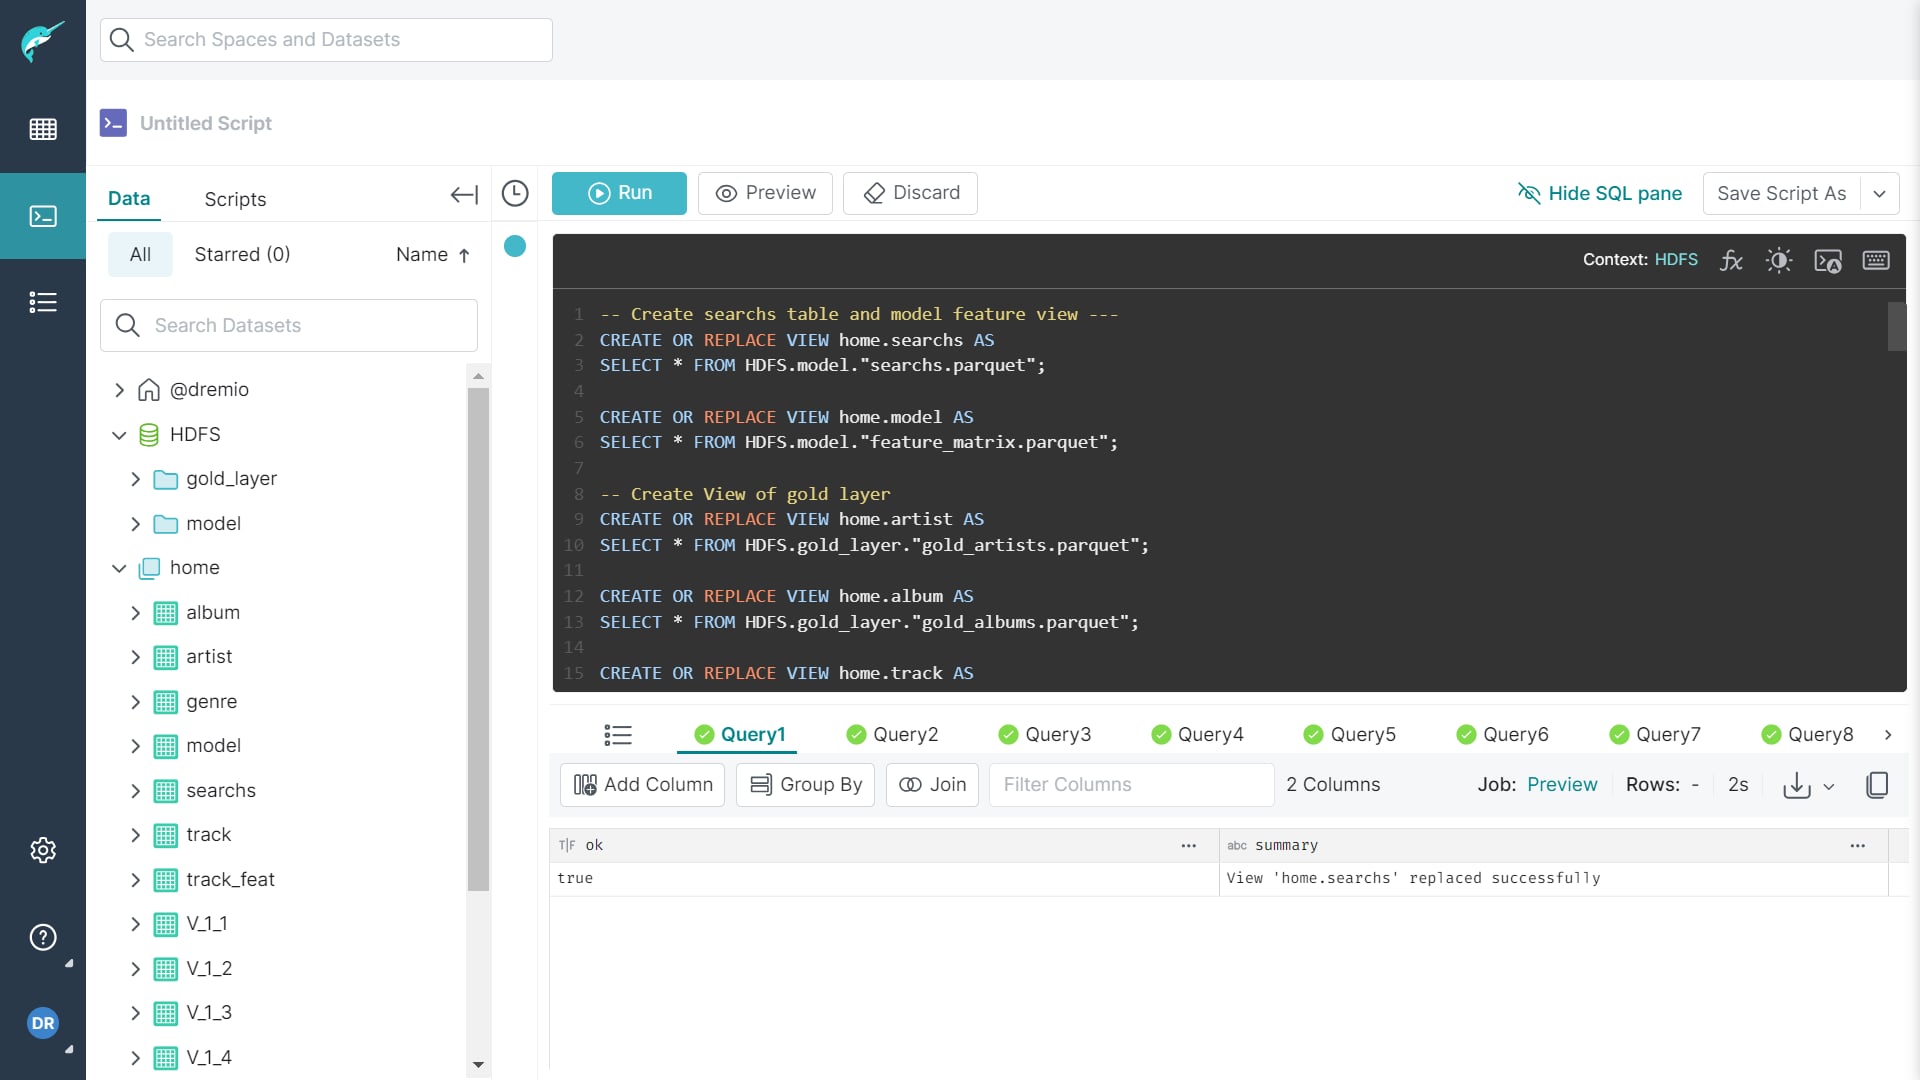
As previously set up, we will use Dremio as an analytic layer to analyze the clean data stored in the Gold Layer within HDFS. The process is straightforward: connect Dremio to HDFS through the Dremio UI at localhost:9047. Then, format the .parquet files in the golde_layer directory, and you’ll be able to write SQL queries to start analyzing the data.
Machine Learning and Dashboard
At this point, the responsibilities of a Data Engineer are largely complete. We will now move on to the tasks of a Data Scientist and Data Analyst, focusing on building machine learning models and generating reports.
K-Nearest Neighbors (KNN)
We will develop a model to recommend music based on the similarity of features between songs, such as loudness, melody, genre, tempo, energy level, and more. To achieve this, we will use a model that can return the top K most similar records from a list of hundreds of thousands of songs. This model is KNN
KNN is a simple machine learning model that helps us find the closest data points to the input data point based on their distance in vector space. The similarity metric we will use is cosine similarity:
$$ S_C(A,B) = cos(\theta) = \frac{A \cdot B}{\Vert A\Vert \Vert B \Vert} = \frac{\sum^n_{i=1}A_iB_i}{\sqrt{\sum^n_{i=1}A^2} \cdot \sqrt{\sum^n_{i=1}B^2} } $$
We will build a model to recommend the top K songs most similar to a selected song as follows:
class SongRecommendationSystem:
    def __init__(self, client, options):
        self.client = client
        self.options = options
        self.knn_model = NearestNeighbors(metric='cosine')

    def fit(self, table_name):
        matrix_table = self._get_table(table_name).values
        self.knn_model.fit(matrix_table)

    def _get_table(self, table_name):
        sql = f"select * from {table_name}"
        return self.client.query(sql, self.options)

    def recommend_songs(self, track_name: str, table_name='home.searchs', num_recommendations=5):
        song_library = self._get_table(table_name).reset_index(drop=True)

        if track_name not in song_library['track_name'].values:
            print(f'Track "{track_name}" not found in the dataset.')
            return None

        features_matrix = self._get_table('home.model')
        track_index = song_library.index[song_library['track_name'] == track_name].tolist()[0]
        _, indices = self.knn_model.kneighbors([features_matrix.iloc[track_index]], n_neighbors=num_recommendations + 1)
        return song_library.loc[indices[0][1:], :]
When testing the system to find songs similar to “Something Just Like This” (it’s not perfect yet! 😅):

PowerBI Dashboard
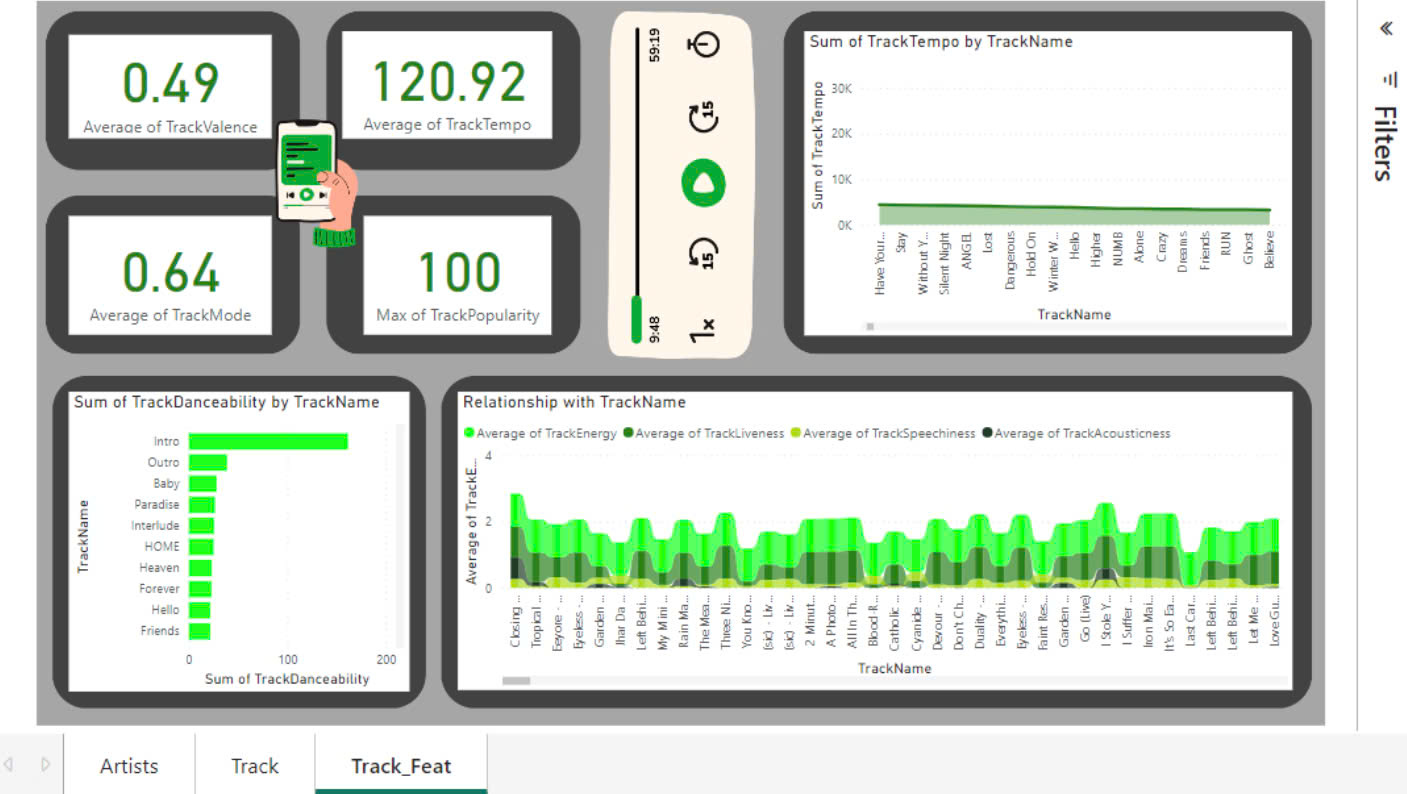
With a large amount of clean data, the next logical step is to derive valuable insights from that data. This is where PowerBI comes into play, allowing us to create a dashboard using data from Dremio.
Application
Finally, we can build a simple application to implement the machine learning model and integrate the dashboard into this application, creating a comprehensive portal. We will use Streamlit to build a simple web app.

Project Demo
Final Thoughts
This project is primarily for learning purposes, so the dataset size and some architectural setups may not be fully complete. However, this marks an important milestone in OG’s learning journey. Hopefully, it will be helpful as a reference for others! 😄
-Meww-
Related
Football ETL Analysis
A Data Engineer project building pipeline to analyze football data
Read more...
